Tuesday, December 10, 2013

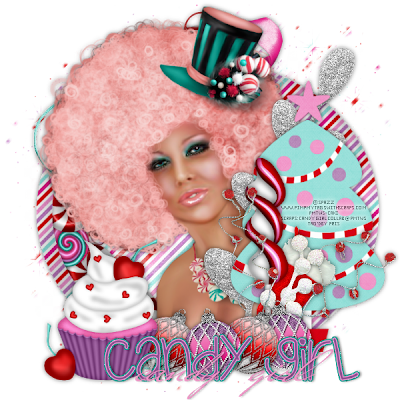
PTU Tut - Candy Girl Part 1 & Snags

PTU Tut - Candy Girl Part 1
==============

♥Supplies♥

Tube
===
You'll need a close up tube for this tut.

Candy Girl by Spazz. You can find it HERE.
This is a Pay To Use tube. You need a license to use it. Do not use this tube without a license.

Scrap Kit
======
Candy Girl (this is part of the Candy Girl Collab at PMTw/S) by Grunge & Glitter
You can find this beautiful kit @ PMTw/S HERE.

Font
===
mtf santa and Versitia

Mask
===
DBV Mask 156  You can find it HERE.
------------------------
♥Let's Start♥

Open a new canvas size 600x600 px and 72 dpi. You can resize later if you want.

Open frame1.png.

Open candy1.png and candy2.png. Add them both to the same canvas, give them a nice drop shadow, and merge them together.
See my tag for placement before merging.

Copy and paste your merged candies under your frame layer and duplicate them 6 times. You should now have 7 of them.
Place them around (rotate as needed) the inside edge of the thin part of the frame. No need to place them under the thicker part because it will be covered.

Open the following elements and place them how I have mine. Resize if needed. See my tag for reference.

ribbon.png
bow1.png
glitterleaves.png
tree.png
stocking.png
lollipop1.png
deco1.png
ornament1.png - duplicate once
ornament2.png - duplicate once
cupcake1.png - mirror

Selections>Select All>Clip to Canvas. Image>Crop to Selection.

Place a nice drop shadow on each layer that compliments the tag.

Open your tube and copy and paste as a new layer and place it under your frame layer.
Duplicate your tube one time and move it above your frame layer.
Make your frame layer active and with your magic wand, click inside the frame.
Selections>Modify. Selections>Expand by 2. Selections>Invert.
On your bottom tube layer, hit delete on your keyboard. On your top tube layer, erase the parts that are out of the frame.
Add a drop shadow to the top tube layer.

Open your mask and add paper1.jpg to the bottom of your tag.

Add your copyright and name.

Save as .png or .jpg, whichever you prefer.

That's it! I hope you enjoyed my tut!

Here are the snags:


Thursday, December 5, 2013

PTU Tut - Save the Boobies Part 3


PTU Tut - Save The Boobies Part 3
==============

♥Supplies♥

Tube
===
You'll need a close up tube for this tut.

Cowgirl by Verymany. You can find it HERE.
This is a Pay To Use tube. You need a license to use it. Do not use this tube without a license.

Scrap Kit
======
Save the Boobies (this is part of the Save the Boobies Collab at PMTw/S) by Alika's Scraps
You can find this beautiful kit @ PMTw/S HERE.

Font
===
Versitia

Plugins
=====
Xero - Soft Vignette

Template
======
BCA3.psd - BCA Collab Templates by Amy & Leah's Gimptastic Tuts
------------------------
♥Let's Start♥

Open the template BCA3.psd and delete the credits.

Merge the circle 1 layer down so both your circle 1 and circle 2 are on the same layer. Then merge circle 3 down to circle 4.

Open as_paper04.jpg and copy and paste as a new layer on top of the rect layer.
Make the rect layer active and selections>select all, selections>float, selections>defloat, selections>invert. Make your paper layer active
and hit delete on your keyboard.

Open as_paper08.jpg and copy and paste as a new layer on top of the thin rects 2 layer.
Make the thin rects 2 layer active and selections>select all, selections>float, selections>defloat, selections>invert. Make your paper layer active
and hit delete on your keyboard.

Open as_paper06.jpg and copy and paste as a new layer on top of the thin rects 1 layer.
Make the thin rects 1 layer active and selections>select all, selections>float, selections>defloat, selections>invert. Make your paper layer active
and hit delete on your keyboard.

Open as_paper03.jpg and copy and paste as a new layer on top of the thin rect 3 layer.
Make the thin rect 3 layer active and selections>select all, selections>float, selections>defloat, selections>invert. Make your paper layer active
and hit delete on your keyboard.

Open as_paper05.jpg and copy and paste as a new layer on top of the circle 1 layer.
Make the circle 2 layer active and selections>select all, selections>float, selections>defloat, selections>invert. Make your paper layer active
and hit delete on your keyboard.

Open the following elements and place them how I have mine. Resize if needed. See my tag for reference.

as37.png
as04.png
as33.png - duplicate and move slightly to the left and down a little.
as03.png
as32.png - Image>Rotate Right
as43.png
as41.png
as23.png


Selections>Select All>Clip to Canvas. Image>Crop to Selection.

Place a nice drop shadow on each layer that compliments the tag.

Open your tube and copy and paste as a new layer and place it under your thin rect 3 shadow layer.
Duplicate your tube one time and Image>Mirror. Merge the two tube layers together and duplicate once.
Make the top tubes layer active and go to Adjust>Blur>Gassian Blur>3.00
Change the blend mode to Screen.
Add a drop shadow to the bottom tubes layer.

Now open up a slightly larger layer of your tube and paste it under your tubes layer.
Go to Adjust>Hue and Saturation>Hue/Saturation/Lightness and just check the box that says colorize.

Now go to Effects>Plugins>Xero>Soft Vignette with the following settings:


Grab your magic wand and click inside thin rect 3 layer, Selections>Modify, Selections>Expand by 2, Selections>Invert and on each tube layer hit delete on your keyboard.

Selections>Select All>Clip to Canvas. Image Crop to Selection.

Make your words 4 layer active and add a drop shadow with the following settings:
Vertical- 0
Horizontal- 0
Opacity- 60
Blur- 10
Color- white (#ffffff)

Repeat the drop on your words 2 layer but instead of white use #fd508a.

On your words 1 layer, go to Effects>Texture Effects>Weave with the following settings:


On your words 3 layer, go to Effects>3D Effects>Cutout with the following settings:


Add your copyright and name.


Save as .png or .jpg, whichever you prefer.

That's it! I hope you enjoyed my tut!


Tuesday, December 3, 2013

PTU Tut - Save the Boobies Part 2


PTU Tut - Save The Boobies Part 2
==============

♥Supplies♥

Tube
===
You'll need a close up tube for this tut.

Pink Power by Elias Chatzoudis. You can find it HERE.
This is a Pay To Use tube. You need a license to use it. Do not use this tube without a license.

Scrap Kit
======
Save the Boobies (this is part of the Save the Boobies Collab at PMTw/S) by PolkaDot Scraps by Chassity
You can find this beautiful kit @ PMTw/S HERE.

Font
===
Liana

Animation
=======
228 by Sophistocat Simone and you can find it HERE.
------------------------
♥Let's Start♥

Open a new canvas size 600x200 and 72dpi.

Open PDS_StB-paper3.jpg and copy and paste as a new layer.
Open PDS_StB-paper6.jpg and copy and past as a new layer. Change the blend mode to Soft Light.

Open the following elements and place them how I have mine. Resize if needed. See my tag for reference.

PDS_StB-scatter.png - duplicate twice and place them in a line across the banner.
PDS_StB-frame1.png
PDS_StB-heart1.png - duplicate and resize the top one so it's a bit smaller than the first one. See my tag for reference.
PDS_StB-heart2.png - Place this element between the little heart and bigger heart.
PDS_StB-feather.png
PDS_StB-birdcage.png
PDS_StB-cupcake.png
PDS_StB-wa.png
PDS_StB-ribbon2.png

Selections>Select All>Clip to Canvas. Image>Crop to Selection.

Place a nice drop shadow on each layer that compliments the tag.

Open your tube and copy and paste as a new layer and place it near the left side of your banner.

Duplicate your tube one time and move it under your PDS_StB-frame1.png layer. Resize and position so her eyes are showing in the frame.
Click inside the frame with your magic wand tool and Selections>Modify>Expand by 2. Selections>Invert.
Make your tube layer active and hit delete on your keyboard.

Now add a drop shadow to your top tube layer (not the one inside the frame, it doesn't need one).

Selections>Select All>Clip to Canvas. Image Crop to Selection.

In your Layers Palette, set your foreground to #e96aa0 and your background to white #ffffff.
Choose gradient with the following settings:


Add a new raster layer to the top and Selections>Select All. Selections>Modify>Contract by 3. Selections>Invert.
Bucket fill the selection with your gradient.
Selections>Select None.
Adjust>Add/Remove Noise>Add Noise with these settings:
Random
38
Monochrome checked

Add a new raster layer under that layer and Selections>Select All. Selections>Modify>Contract by 4. Selections>Invert.
Bucket fill with #fdd2e3.
Selections>Select None.

Add a drop shadow to the second banner frame layer.

Add your copyright and name.

If you don't want to animate, you can merge visible and save as .png or .jpg.

ANIMATING
--------------

In PSP, hide all layers except your two paper layers. Layers>Merge Visible.

Now hide the newly merged paper layer and unhide all the other layers. Layers>Merge Visible.

You should now have 2 layers in total.

Hide the top layer (the one with all the elements, tube, etc.) and Edit>Copy and Paste As New Animation in AS.
Hit Ctrl + L until you have 21 frames. Ctrl + A.

Back to PSP and unhide the top layer and hide the bottom layer. Edit>Copy and Paste As New Animation in AS.

Now, open your animation in AS and hit Ctrl + A. Then Animation>Resize Animation with the following settings:


Edit>Copy. Go back to your banner (the paper layer) and Edit>Paste>Into Selected Frame and click when you position it where you want it.

Now, go to your other banner (the elements layer) and hit the Propagate Paste button.

Hit Edit>Copy. Edit>Paste>Into Selected Frame and click when you get it perfectly centered.
Ctrl + A on your completed banner and go to Animation>Frame Properties and change it to 13.

Save as .gif.

That's it! I hope you enjoyed my tut!


PTU Tut - Save The Boobies Part 1


PTU Tut - Save The Boobies Part 1
==============

♥Supplies♥

Tube
===
You'll need a close up tube for this tut.

149-2 PinUpToons by PinupToons. You can find it HERE.
This is a Pay To Use tube. You need a license to use it. Do not use this tube without a license.

Scrap Kit
======
Save The Boobies (this kit is part of the Save the Boobies Collab at PMTw/S) by Danielle Corbitt Designs
You can find this beautiful kit @ PMTw/S HERE.

Font
===
Ribbon of Hope

Mask
===
DBV Mask 88 You can find it HERE.
------------------------
♥Let's Start♥

Open a new canvas size 600x600 (you can resize later) and 72dpi.

Open dcorbitt_savetheboobies_frame3.png and copy and paste as a new layer.

Open the following elements and place them how I have mine. Resize if needed. See my tag for reference.

dcorbitt_savetheboobies_rose.png
dcorbitt_savetheboobies_tag.png
dcorbitt_savetheboobies_bow2.png
dcorbitt_savetheboobies_flower.png-duplicate and resize the top one a little so it looks like the smaller one in my tag. They are behind the bird cage.
dcorbitt_savetheboobies_bowwithkey.png
dcorbitt_savetheboobies_bow.png
dcorbitt_savetheboobies_parasol.png
dcorbitt_savetheboobies_wordbits.png-grab your Selection tool and draw a rectangle around the "Courage" tag, Edit>Cut, Edit>Paste as New Layer.
dcorbitt_savetheboobies_birdcage.png

Place a nice drop shadow on each layer that compliments the tag.

Crop and resize as desired.
**Note: I try to resize my tag before adding the tube so it doesn't get so blurry. You can resize when you prefer.**

Open your tube and copy and paste as a new layer under your frame's shadow layer.

Click inside your frame with your magic wand tool and Selections>Modify>Expand by 2. Selections>Invert

Make your tube layer active and hit delete on your keyboard.

Now add a drop shadow to your tube.

Layers>Merge>Merge Visible

Open your mask and paper dcorbitt_savetheboobies_pp4.jpg and place it at the bottom (of course, lol).

Add your copyright and name.

Save as .png or .jpg. Whichever you prefer.

That's it! I hope you enjoyed my tut!

**Note: If your tag looks a little blurry after resizing, try going to Adjust>Sharpen>Sharpen and see if it helps. The tag I've placed at the top of this tut has been sharpened.**


CT Tags using PTU kit Fall Glory

2 Tags by CakiePotPie Designs for Redheaded Ladybug Scraps using the adorable PTU kit "Fall Glory" available @ Sweet Pinup and PinkParadoxProductions.


Thursday, November 28, 2013

Green Candy Christmas CT Tag and Freebie Cluster Frame

Green Candy Christmas is Queenie's first PTU kit and it's so cute! 
I've made a tag and a cluster frame using it! 
You can purchase her kit HERE and view her store HERE.
You can grab my cluster frame on my blog HERE.


Wednesday, November 20, 2013

PTU Tut - Attitude

PTU Tut - Attitude
==============

♥Supplies♥

Tube
===
You'll need a full or at least one with 2/3 of a body tube for this tut.

Olga by Elias Chatzoudis. You can find it HERE.
This is a Pay To Use tube. You need a license to use it. Do not use this tube without a license.

Scrap Kit
======
Attitude II by Pimp'd Designz
You can find this beautiful kit @ PMTw/S HERE.

Font
===
Styleboy ITC
------------------------
♥Let's Start♥

Open a new canvas size 800x800 (you can resize later) and 72dpi.

Open pd-frame-03.png and copy and paste as a new layer.
Rotate it to the right so the slim side is on the right side.

Open the following elements and place them how I have mine. Resize if needed. See my tag for reference.

pd-wa-01.png
pd-stars-05.png
pd-flower-01.png-at the bottom of the cluster
pd-stars-03.png
pd-flower-01.png- at the top of the cluster
pd-notebook.png
pd-flower-03.png- right on top of the notebook
pd-kiss-01.png
pd-skull-heart.png
pd-string-01.png
pd-flower-02.png
pd-flower-03.png- right on top (the one with my copyright info on it)

Place a nice drop shadow on each layer that compliments the tag.

Crop and resize as desired.
**Note: I try to resize my tag before adding the tube so it doesn't get so blurry. You can resize when you prefer.**

Open your tube and copy and paste as a new layer above your frame but under pd-wa-01.png layer.

Using your magic wand, click inside your frame, Selections>Modify>Expand by 2 and Selections>Invert.

Select your top tube layer and use your eraser tool to erase the bottom half of your tube that's out of the frame.
Repeat with your bottom tube layer.

Now add a drop shadow to your tube.

Open paper pd-pp-12.png and copy and paste as a new layer under your bottom tube layer.

Grab your magic wand again, click inside the frame and Selections>Modify>Expand by 2 and Selections>Invert.

Make your paper layer active and hit delete on your keyboard.
Selections>Select All>Clip to Canvas. Image>Crop to Selection.

Now open pd-print-01.png and copy and paste as a new layer above your paper layer but below your bottom tube layer.
Change the blend mode to Screen.

Layers>Merge>Merge Visible

Add your copyright and name.

Save as .png or .jpg. Whichever you prefer.

That's it! I hope you enjoyed my tut!